Wednesday, April 27, 2011

Lose Some, Gain Some and Muesli Cookies


Its must have been a long while since I exercised regularly. For the past two weeks while I was away for Reservist training, I found it to be especially physically exhausting. Perhaps age is fast catching up on me too. Whichever it is, it just signifies that it is time for me to hit the running track and go for laps in the pool.

When I got back home after training was over, I got a rude shock. My laptop went down. What a nice timing it had to be.... My baking pics were all gone, including pics for two backlogs - raisin oatmeal cookies and a cookies and cream cake, along with other files that were in my hard disk. My windows vista even got downgraded to windows XP as the recovery disk was one for windows XP.

On a positive note, my friend got me a stand mixer at a real steal - a 1150W 5L capacity beater (lesser known brand), all for only 50 bucks. Well, I guess sometimes you lose some but you gain some in return. I am going to use it for bread making and big-batch baking. The two extra mixing bowls could come in handy too.


I missed baking a great deal now that I have endured two bake-less weeks. For a start, I tweaked the raisin oatmeal recipe and used raisins + Dorset Cereals (low sugar content, with natural sweetness from dried fruits) instead to churn out a batch of Muesli Cookies. The great thing about using Dorset Cereals is that they offer a wide variety of dried fruits and nuts all mixed together. And how did it turned out? Chunky, oaty-nutty-fruity cookies which were cereals-ly good! 

Muesli Cookies (recipe adapted from the Art & Soul of Baking by Cindy Mushet
Serving size: 40 cookies
Taste and texture: Chunky, nutty, fruity. 
Equipment and materials: 
  • Stand electric beater/ handheld electric beater or wooden spoon
  • Flour sieve
  • Measuring spoon set
  • Spatula
  • Mixing bowls
  • Wire rack
  • Baking trays/ cookie sheets
  • Baking / parchment paper

Ingredients:
  • 120g unsalted butter, softened at room temperature
  • 80g brown sugar
  • 35g castor sugar
  • 1 egg, lightly beaten (60g with shell)
  • 150g plain flour
  • 1/4 tsp baking powder
  • 1/4 tsp baking soda
  • 1/4 tsp salt
  • 190g muesli (I used Dorset Cereals)
  • 75g raisins

Making the Cookies:

Mixing dry ingredients - Sift plain flour, baking powder, baking soda and salt into a large mixing bowl. Whisk with a balloon whisk to distribute them evenly.  

Cream butter - Beat the butter and both sugars on medium speed for 2 minutes until butter mixture is fluffy. The butter need not be as well-creamed as that for making cakes.

Making the cookie dough - Stir in the egg into the creamed butter and mix on medium low speed until combined. Next, s
tir in flour mixture and beat on low speed to combine butter-egg mixture and flour briefly. Stop once the dough starts to comes together. Scrape and fold in any stray flour with a spatula. Lastly, fold in the  muesli and raisins. 

Baking the cookies - Scoop leveled tablespoons of dough onto baking trays/sheets lined with baking paper, leaving 1.5 inch between each cookie dough. Preheat oven to 180 degrees C and bake for 12-18 minutes. Once done, the cookies should be firm to the touch and will firm up further upon cooling. Leave cookies to cool completely on a wire rack before storing in air-tight containers.


Notes:
  1. Bake cookies for 12 minutes for softer cookies or 18 minutes for firmer cookies. 
  2. cookies do not spread much since there is a great amount of oats, nuts and dried fruits. 
  3. Use 140g rolled oats and 100g raisins for raisin oatmeal cookies. 

Notice:

If you wish to post the recipe and instructions online, please give due credit and do re-phrase the instructions. I have taken quite a bit of effort to construct, edit and type them out. Thank you =]

Monday, April 11, 2011

Bears and Chicks Cupcakes and a Devil's Chocolate Cake

(picture courtesy of R's friend)

50 decorated cupcakes; a Devil's Chocolate Cake; one week of planning; 7 batches of cake batter; several kilograms of baking ingredients; a few specially selected trusty recipes and countless hours of warring in the kitchen with my Philips handheld beater and my 26L Tefal tabletop oven. All these were part and parcel of a cake order for R's 21st birthday party.

This has to be the biggest cake order I have recieved to date. When I take orders, they are in the form of a favour for cherished friends or people who are close to me. The last thing on my mind would be any monetary returns in the form of profits. If there would be any form of gratification, it would be the smiles and 'Thank Yous' in return, not to mention the sense of satisfaction that I derive. Afterall, I am doing something that I enjoy the most.

I have to admit it is indeed a big challenge to cater to 100 pax as it is a huge order. First of all, my oven can only handle a single batch of batter at a time. Secondly, the main cake would be one that is able to feed around 50 people and the maximum pan size my oven can hold is a 12 x 12 inch square pan. Thirdly, I have not made any elaborately decorated cupcakes and I am not sure if I am up to the task. Lastly, the cake order is meant for R's 21st Birthday and I do know how important a 21st birthday party can be. Therefore, I have to ensure that the cakes are visually presentable as well as pleasant to the palate.

(picture courtesy of R's friend)

After discussiung with R on his preferences and having done some brainstorming, I had this grand plan forming in my mind:

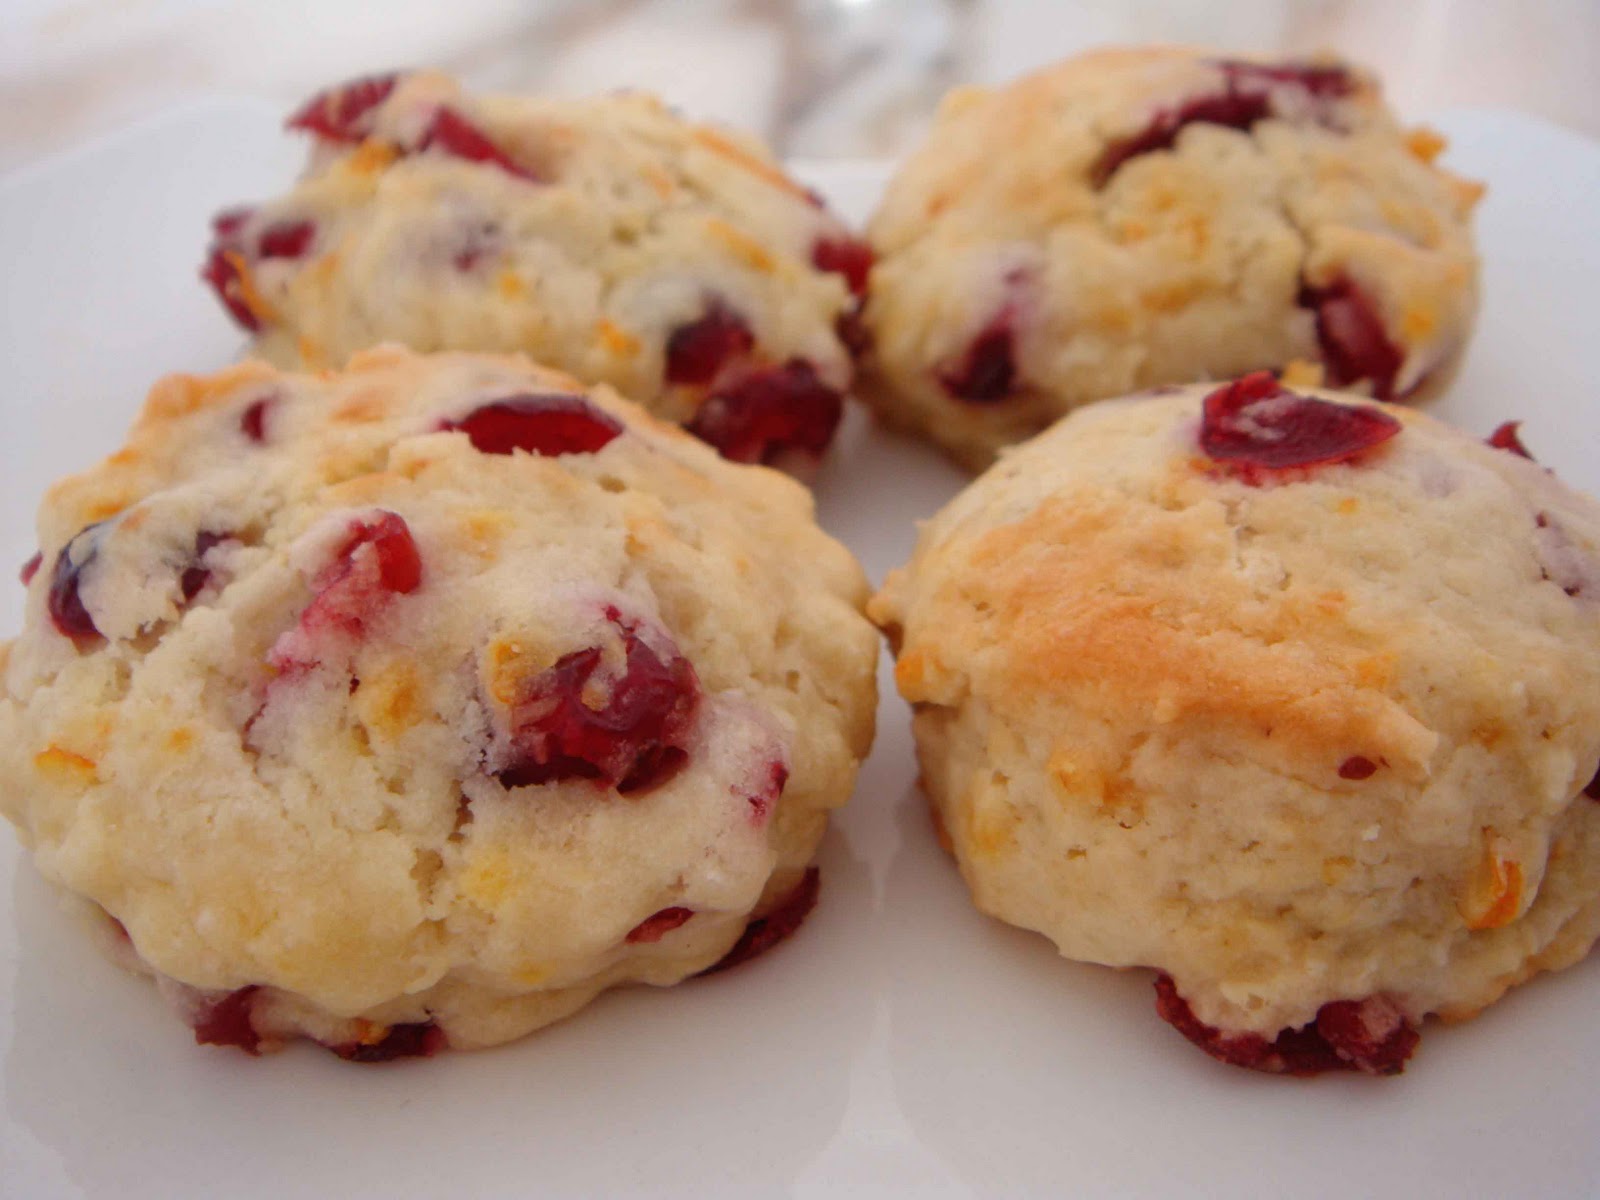
1) The 50 cupcakes would be vanilla and chocolate flavoured. I was deliberating on the vanilla cupcake recipe to use. In the end, I decided on Rose's Yellow Butter Cupcakes. Made two batches of them and ate one to QC (quality control). The texture is velvety and it gives a very rich creamy aroma, thanks to the combination of butter, vanilla and yoghurt.

For the chocolate cucpakes, I used the recipe here and tweaked it a little by omitting the rum and raisins, adding more sugar and milk. The texture is moist, slightly fudgy and lighter than a typical dense chocolate cake.

(picture courtesy of R's friend)

2) For the choice of colours, it would be a blue and white theme for the cupcakes. All the cupcakes are to be frosted with Swiss meringue buttercream in an alternate blue and white fashion. 26 of them would contain letterings and there will be one letter per cupcake.

(picture courtesy of R's friend)

3) The cupcake letterings are to be either cut-out from fondant or piped with buttercream. I tried searching around for alphabet cookie cutters but could not seem to find a suitable one. Hence, I settled for buttercream instead. Used a small Wilton round tip to pipe and connect dots to form the letterings. It wasn't exactly difficult or tedious to do. All it takes is some practice.

Bear prototype 1 with reference to these teddy bear cupcakes. The original ones are done using cookie cutters. I moulded mine by hand, hence the great disparity.

Bear prototype 2

Fat baby chick protoype and bear prototype 2 with off-focus eyes

4) R requested for 12 fondant bears and 12 fondant chicks. To make the fondant animal figurines, I borrowed a couple of books on fondant cakes and did some browsing on the ever-so-reliable internet. This is the first time I am making bears and chicks with fondant but I figured that I should be able to mould some simple bears and chicks with close reference to youtube videos and pictures on Flickr or Google. So, after some trial and practice, I came up with two different bear protypes and a fat baby chick prototype. Making the prototypes took me a quite. I showed R the prototypes and he preferred the 2nd bear prototype. As for the chick, he laughed that it was a fat one. Afterall, it is a fat baby chick.  

5) The main cake would be an 12 inch big square chocolate cake. The frosting would be either whipped ganache or bittersweet dark chocolate frosting aka Devil's Chocolate Frosting. Settled for Devil's chocolate frosting as it is easier to do (since I have prior experience of making it) and it yields good results. To contrast the thick fudgy heavy frosting, the choice of cake layers would be chocolate chiffon sponge.

In all, I used 2.5 x recipe of Devil's Chocolate Frosting (weighs almost close to 2kg!) and 3 batches of chocolate chiffon sponge, each batch baked in a 12 inch square pan one at a time to yield a total of 3 layers. After assembling, frosting and trimming the sides of the cake, it was about 11 inch square in size and about 3 inches tall. This Devil's chocolate cake is different from the Devil's Food Cake I have made earlier. Both cakes use the same frosting but the cake layers are different.

(picture courtesy of R's friend)

Since the cake order is for an important occasion, it would be a shame to scrimp on the ingredients. Here are the quality ingredients (really good stuffs!) I used to maximize the performance of the recipes, giving the cakes an extra oopmh in flavour and texture:
  • Nielsen Massey Madagascar Bourbon Vanilla for the yellow butter cupcakes and vanilla buttercream (swiss meringue)
  • Several slabs of Elle &Vire French butter for the cupcakes and most of the vanilla buttercream until I ran out of the butter.
  • SIS castor sugar (extra fine sugar) for finer texture in cakes.
  • Prima cake flour and Self Raising flour. I have been using Prima flour for all my bakes and it works really good. The plain flour itself is as fine as cake flours from other brands as it has consistently low protein content, according to observations from Stephanie which I definitely agree with. It is a very trustworthy brand. Will be sticking to Prima flour for as long as I bake.
  • 1 kg of Callebaut Belgium Chocolate for the devil's chocolate frosting. One of the better chocolate brands for baking.
  • About 200g of Valrhona cocoa powder for the chocolate chiffon sponge and devil's chocolate frosting. Definitely the best cocoa powder you can find in SG. It's one ingredient I always stock up in my pantry.
  • 9 tbs of Baileys (with a hint of caramel) for the devil's chocolate frosting to accentuate the chocolate factor. I don't suppose anyone got drunk eating the cake.

fondant bears without painted eyes

S came over my place and offered to help out with the devil's chocolate cake. Throughout the entire process, he almost annoyed the hell out of me like a menace! He even 'threatened to wreck havoc' on the delicate chocolate chiffon sponge layers by not adhering to my instructions, as if I was'nt busy enough already. S even claimed that cakes are not difficult to make and he do not see what could possibly go wrong. He definitely over-simplified the process and underestimated the science of cake making.

Having said those words, he accidentally sifted cocoa powder onto the sugar meant for egg whites, which might eventually result in the egg whites failing to whip properly. That was not all the 'trouble' he caused. After I explained that things could go awfully wrong and I did not want to waste precious ingredients and time re-doing cake batters, he told me it was alright if I could not deliver the cake on time. How very helpful and sensitive of him (yeah sarcasm meant here)....

The fatigue and stress levels in me was already building up to dangerous levels. I would have given him a good piece of my mind if he was'nt a good buddy of mine, but I told myself to focus on churning the sponge layers out and calmed myself down to prevent the dormant-turned-active volcano in me from erupting. I can tolerate with his nonsense anytime but not when it comes to making cakes for an important occasion! To set the record straight, I didn't plan hard for things to fail or turn awry. Afterall, I have the responsibility on my shoulders and if anything turns out for the worst, how am I supposed to answer to R? The morale of the story - don't mess me when I am seriously baking cakes...

On the contrary, S was a great help though when I was making the fondant chicks, helping to portion out doughs for the chicks' body parts. Looks like his presence served a useful purpose afterall...

12 blue fondant bears and 12 white chicks

To tell the truth, I was casting doubts on myself while I was doing the cakes batches after batches, sometimes even wondering why I volunteered to take the order. Maybe I overstimated my abilities or am too ambitious. I must thank R for placing his faith and trust in me that I will complete the task to his expectations. Thankfully, everything managed to come together in one piece. There was a flaw though - my 2nd batch of buttercream turned out yellowish due to the Goldtree butter which has a deep yellow tone, compared to the off-white colour of Elle &Vire butter. Hence, you can see most of the piped wordings turned out yellowish instead of being off-white, something which I did not anticipate.

R smsed me to thank and inform me that his guests were impressed with the cupcakes and especially the chocolate cake, which they found to be really chocolatey. Nothing beats more than a reward like this to know that the cakes are well received.

Actually, I didn't get to witness how the cupcakes would look like when fully arranged on a table as I was unable to attend the party. I packed the cupcakes in 3 boxes and the fondant figurines in a separate box which are to be assembled on site, as I wanted to be doubly sure that the fondant figurines would not soften/melt or leak colour to the buttercream. Even though I had a mental picture of how the overall outcome would look like, I wished I had been there to assemble and arrange the cupcakes myself. It wasn't until when S sent me a picture did I realise how the final arrangement would turn out to be like.

Swiss Meringue Vanilla Buttercream
180g egg whites
120g granulated sugar
375g unsalted butter, softened but still cold
3 1/2 tsp vanilla extract

Preparing the Vanilla Buttercream:

Dissolve sugar in egg whites - Place 180 egg whites and 120g granulated sugar in a heatproof bowl. Sit the heatproof bowl on a saucepan filled with water. The base of the bowl should not be in contact with the water. Bring the water in the saucepan to a slight simmer. Use a balloon whisk and stir the egg whites and sugar constantly until the sugar has fully dissolved (egg white mixture should not feel gritty) and the mixture is warm to the touch (test by inserting a finger).

Beating egg whites - Remove the heatproof bowl and beat the warm egg white mixture on medium high speed to obtain stiff peaks using an electric beater. At stiff peaks, the beaten egg whites will not budge when bowl is overturned. When the beaters are lifted from the beaten egg whites, the surface of the egg whites should form stiff upright peaks (not drooping peaks). The beaten egg whites should be cool to the touch (room temperature), not warm like when it was removed from the saucepan.

Adding butter and vanilla - Beat in 375g butter into the beaten egg whites in 3 batches, ensuring each batch is incoporated before adding the next. The mixture might turn watery/curdle when butter is added. Continue beating and the buttercream will firm up. Beat until the mixture is firm, creamy and fluffy. Lastly, add in 3 1/2 tsp vanilla and continue beating to obtain a smooth vanilla buttercream.

Note:
1) Compared to my other buttercream recipes, this one uses much less sugar as there is no cocoa powder(bitter) or tart citrus juices (lemon) present.
2) Yields enough to frost about 20 medium cupcakes.


Thursday, April 7, 2011

Orange Cranberry Scones and Awards


These scones were meant for last month's aspiring bakers but somehow I forgot about it. I realised my past few posts were all about cakes. Time to break the monotony before I get back to cakes again.


This was my second time baking scones. Compared to my previous cream scones, these orange craneberry scones are less rich and they need a little jam to boost the flavour, despite the fact that I used good quality butter. Perhaps it was due to the absence of salt, which I was lazy to include as I have to open a new pack.


Once again, I am honoured to recieve this lovely blog award from two fellow bloggers, Alice from I Love. I Cook. I Bake and Bake for a Queen. Thank you ladies =]

Here are rules to abide for accepting this award: 
  1. Post linking back to the person that gave you the award.
  2. Share 7 random things about yourself.
  3. Award 15 recently discovered blogs.
  4. Drop them a note and tell them about it.
Ok, here's 7 random things about myself:

1) I used to have a pet Maltese named Ashley staying with me. He's a male! Most people would associate the name with a female. He's now staying with my brother's family.

2) My favourite colour is green. Green used to be the colour theme for my blog when I firsted started blogging. It was a little dull and hence I changed it to the current blue theme which matches my blog layout. I might change it back to Green if I can find a nice green colour.

3) Of all bakes, I enjoy eating cakes the most, followed by cookies and bread. I'm quite a bread person but I always tend to procrastinate when it comes to bread making. Hence I am very stagnant in this aspect.

4) My favourite baking related show is called Cake Boss ( TLC channel) starring Buddy Valastro, his family and his bakery. He's a really talented cake artist and the show is humorous and entertaining. Wish I could make cakes like him one day. The fondant cakes he make are awesome! Imagine a safari theme cake, a 3D standing dog cake and a moving robot cake. Neat!

5) I am quite a bakecook fanatic. Currently I have around 60 titles. The bulk of it are chocolate, cake and cookie titles. Most of the titles are by asian authors. I even have a long wishlist of about 50 books which I would want to have, all of which are by western authors.

6) I think I am addicted to fondant making. I am not quite fond of eating fondant though. Will be adding fondant books to my bakebook wishlist.

7) When the time comes, I would want to go for professional courses to further my baking skills. At the moment, I can only rely on books, blogs, videos and internet articles.

I will be passing the award to the following bloggers: 
  1. Eelin from The Batter Baker
  2. Allie from Sweets and Loves 
  3. Sheryl from Life is too Short, Eat Desserts!
  4. Shirley from Kokken 69
  5. Fatmum from FatmumBaking
  6. Aimei from My Baking Cottage
  7. Josephine from Sugar & Everything Nice
  8. Blessed Homemaker  from Blessed Homemaker
  9. Wendy from Wen's Delight
  10. Jess from J3ss Kitch3n
  11. Jesslyn from Bakericious
  12. Pei-Lin from Dodol & Mochi
  13. Swee San from The Sweet Spot
  14. Wendy from Wendyinkk
 
Orange Cranberry Scones ( recipe adapted from The Art & Soul of Baking by Cindy Mushet)
Serving size: about 12 scones
Texture: Crisp and crumbly on the oustide; fluffy and cake light, moist in the interior. 
Equipment and Materials:
  • Measuring spoon set
  • Flour sift
  • 1.5 inch round cookie cutter
  • Mixing bowl
  • Parchment/baking paper
  • Wire rack
  • Weighing scale
  • Wire whisk
  • Flexible spatula

Dough:
185g plain flour
30g castor sugar
zest of 1 orange
1 tsp + 1/4 tsp baking powder
1/4 tsp baking soda
a pinch of salt
80g unsalted butter, chilled and cubed
60g dried cranberries
homemade buttermilk => 120ml milk  + 1/2tbs lemon juice, (leave to stand for 10 mins)

Making the scones:

Combine dry ingredients - Sift the flour, baking powder and baking soda into a large mixing bowl. Add in the sugar, zests and salt. Use a wire whisk to aerate and disperse the mixture evenly.

Blend in butter - Tip in the cubed butter into the flour mixture. Use your hands and rub the chilled butter into the dry ingredients. The result should be that of fine and coarse flour-coated butter crumbs. Work fast to prevent the butter from melting.

Alternatively, use a pastry cutter or 2 knifes to cut the butter. If using 2 knifes, cut the butter into the flour mixture in a criss cross manner.

A food processor can also be used if you have one. If using a food processor, whisk the dry ingredients together for about 15 seconds. Add in the cubed butter and pulse a few times with 1 second intervals until fine and coarse flour-coated butter crumbs are obtained.

Adding the cream and cranberries - Add in cranberries to the coarse flour-coated butter crumbs and stir to distribute the berries evenly. Pour in the homemade buttermilk into the flour-coated butter crumbs. Use a fork and stir to obtain a moist sticky mixture. 

Shaping and chilling dough - Lightly flour a work surface. Turn out the moist sticky mixture onto the work surface and gently gather the mixture together, pressing in stray dry ingredients into the main dough. There is no need to knead the dough. Wrap the dough in cling film and flatten it to obtain a disk 1 inch in height. Chill in the refrigerator or freeze till it is very firm. Dough must be very firm else it will be difficult to work with.

Prepraring the oven - Meanwhile, preheat the oven to 210 degrees C (recipe asked for 220 degrees C).

Cutting out rounds - Once dough is chilled, turn the flattened disk out onto a floured work surface and cut out rounds using a round cookie cutter dusted with flour. Arrange the cut out rounds 1 inch apart on a baking tray lined with baking parchment. Gather the remaining scraps, flatten them into a disk 1 inch in height and repeat the chilling process. Repeat the cutting of rounds for a second time.

Gather the remaining scraps after the 2nd cutting and flatten them into a round disk 1 inch in height, for a final time. Cut the disk into wedges.

Chill all the cut-out rounds and wedges for another 20minutes or give them a quick freeze to firm them up. If the dough is too soft, it will lose its shape in the oven.

Baking the scones: Bake the scones for 14 -16 minutes or untill the surface is golden brown. Remove to cool on a wire rack.

Notes: 
  1. These Scones taste best when served warm.
  2. Dough can be prepared beforehand and chilled overnight (one night maximum) or frozen for weeks. The dough may not rise as much as when it is freshly made on the same day.
  3. Store remaining scones in an airtight container. Warm them in a toaster or oven before serving.

Notice:

If you wish to post the recipe and instructions online, please give due credit and do re-phrase the instructions. I have taken quite a bit of effort to construct, edit and type them out. Thank you =]

Saturday, April 2, 2011

Modelling with Edible Playdough - My 1st Fondant Cake

assembled layers, waiting to be frosted

For the past week, I was planning for a major cake project for an event on friday. It was meant for someone special. In my mind, I was envisaging how it would turn out to be. There are endless unknown factors, since it is my maiden attempt at doing a fondant cake. Due to a turn of events, the final outcome deviated from the original plan. Here is how the cake was supposed to turn out orginally: 
  • Chocolate cake layers frosted with orange cream cheese frosting
  • Rolled white fondant icing to cover the frosted cake
  • Base of cake surrounded with fondant roses and green leaves
  • Cake to be adorned with butterflies, bees and ladybirds
  • Female figurine seated in front of a grand piano

crumb coated layers

Levelling the cake layers and frosting them was something that I had always enjoyed doing. Witnessing the cake layers stack up gradually into a tall and glorious cake gives me a sense of satisfaction. This could possibly be the tallest layer cake I have made to date, comprising of four chocolate cake layers. It would have been even taller if the domed part wasn't sliced off.

1st attempt at covering the cake

This was the first attempt at covering the cake. The fondant rolled out smooth but somewhat thin. While smoothing the sides and top, some parts of the fondant broke. What came as a bigger rude shock was the unusually warm weather had caused the seemingly stable cream cheese frosting to melt/separate when I covered the cake with fondant icing. Perhaps it was also due to heat from my palms since I used my palms to smooth the sides before using a bench scraper. Some frosting even leaked out from the base.  

As a result, I peeled off the fondant, scraped off the frosting and re-worked the covering. The second attempt was in no way better. The surface was wrinked although it did not break. I suspect the icing could have been too stiff/dry and the wrinkles were caused by stretching when the fondant was lifted. To cover the flaws, I covered the sides with rainbow coloured stripes and the surface with black fondant with the help of my friends. Of course, it meant a lot more extra work.


The worst disaster that could strike a fondant cake is that fondant tends to 'sweat'. Moisture is a sworn enemy to fondant icing and it could threaten the appearance/strucure of fondant decorations. With the tropical all year round summer temperatures in Singapore, chilled fondant cakes will tend to condense immediate after they are retreived from the refrigerator (huge difference in room temperature and temperature in refrigerator ). I have seen how my fondant cake 'sweat' profusely. It is traumatic experience that bakers wouldn't want to go through.

Even though there were several tough obstacles to clear, I'm glad the cake was assembled in one piece. There are several lessons to take home and many aspects to improve on from this fondant cake experience:
  1. Take care not to roll fondant too thinly when covering the cake.
  2. Make sure fondant is not too stiff/dry when rolling it out to cover the cake.
  3. Fondant tends to sweat alot when condensation takes place. Need to find solutions to solve this. One method would be to store the cake in an air-conditioned room instead.
  4. Perhaps omit the frosting and do a thin layer of crumb coat instead to prevent frosting (buttercream, cream cheese frosting etc) from melting due to warm temperatures or do not use bare hands to smooth sides at all to prevent frosting from melting.
  5. Make sure sides are straight when stacking the cake layers.

Despite that this cake turned out amateurish, I am glad I accomplished a few tasks related to fondant:
  • Managed to practice covering frosted cake with fondant icing
  • Learnt how to colour fondant
  • Learnt how to make use of materials such as toothpicks and drinking straws as support structures for fondant decorations
  • Learnt to do fondant roses (by watching youtube video)
  • Managed to do a grand piano. The difficult part about making the grand piano is setting up the support and getting the main body to be dry and stiff.
  • Managed to do hair for a human figurine. This part is very time consuming. Doing the hair component looks a lot more difficult than it seems. Need to improve on the facial features and the body proportions in future.

Overall, the fondant cake was done with a minimalist approach in terms of tools and materials. Most of them are inexpensive except for the colouring which cost a lot more. The following are the items used:
  • Bench scraper to act as a fondant smoother
  • Cocktail sticks/ toothpicks for suppport and to colour fondant
  • Drinking straws to act as legs for grand piano
  • Cardboard covered with fondant to do the piano lid. (note that fondant cannot be rolled too thinly for supporting structures)
  • A small paring knife to cut out letterings/alphabets
  • Assorted Wilton colours (paste)
  • Butterfly cookie cutter which I have on hand
  • Rolling pin

I don't think I will be attempting a fondant cake anytime soon as it is too time consuming but I will be practicing with some modelling in the meantime.

The following video demonstrates on how to cover a frosted cake with fondant. Hope it is helpful.


Chocolate Cake with Cream Cheese Frosting ( recipe adapted from Chocolate Ephipany by Francois Payard)
Serving size: Makes a 8 inch round layer cake. Serves 10 to 12 slices
Taste and texture: Cake base is dense, moist and a little fudgy (brownie-like). Cream cheese frosting  is citrusy and creamy.
Equipment and materials:  
  • Two 8 x 3 inch round pans
  • 9 inch round cake board
  • Cake leveller or palette/serrated knife longer than 8 inches
  • Rubber spatula
  • Handheld beater/Stand beater
  • Baking paper
  • Wire rack
  • Toothpick/wooden skewer
  • Flour sieve
  • Mixing bowls
  • Cake turntable (optional)

Chocolate Cake (I did 2 x recipe, in two batches, for two 8x3 inch round pans. One recipe portion yields 2 layers):
  • 55g cocoa powder (use valrhona for best results)
  • 250ml water
  • 130g unsalted butter, at room temperature
  • 220g castor sugar
  • 55g egg yolks, at room temperature
  • 165g plain flour
  • 1 tsp baking powder

 Making the Chocolate Cake:

Prepare Oven and baking pan - Preheat oven to 170 degrees C. Line and grease two 8 x 3 inch round pans with baking paper.

Dissolving cocoa - Place 250ml water and the cocoa in a pan and heat the mixture on medium heat. Stir the mixture to ensure cocoa powder dissolves fully. Remove pan from heat and set aside to cool completely.

Prepare flour mixture - Sift flour and baking powder in a large bowl. Whisk to combine and allow the dry ingredients to be evenly distributed.

Creaming the butter - In a mixing bowl, cream butter and sugar on medium-high speed until colour turns pale and mixture is fluffy. The volume of the mixture will increase as air is beaten in. Refer to how-to-cream-butter.

Making the batter - Beat in egg yolks in three additions on low speed. Ensure each addition is well combined before adding the next. Scrape the sides and bottom of the bowl with a spatula to incoporate loose ingredients.

Add in all the flour and beat on low speed until the last bit of flour is absorbed (just combined). Scrape the sides and bottom of the bowl with a spatula to incoporate loose ingredients and mix the batter gently with the spatula.

Lastly, pour in the cocoa liquid. Beat the mixture on low speed to obtain a smooth, well combined batter. Do not overbeat. Scrape the sides and bottom of the bowl with a spatula to incoporate loose ingredients.

Baking the cake - Pour batter into lined 8 x 3 inch round pan and bake for 35- 45 minutes, or until skewer inserted in the middle comes out clean. Allow cake to cool in the pan for 5 minutes before turning out to cool upright on a wire rack. (I made the chocolate cake twice, in two batches, to yield two cakes.).

Orange Cream Cheese Frosting:
  • 440g cream cheese, softened
  • 140g unsalted butter, softened
  • 100g icing sugar (add more if needed, to achieve desired consistency)
  • 5 tbs orange juice (one tbs at a time, to desired consistency)
  • zest from 2 oranges  

Making the Frosting:

In a mixing bowl, beat cream cheese and butter on medium high speed until it is no longer lumpy. Add in sugar and continue to beat until sugar is combined and mixture is light and fluffy. Next, add in orange juice one tablespoon at a time until it reaches your desired consistency. Add in orange zests and continue beating until mixture is well combined.
 
Cake Assembly:

Slicing chocolate cake - Slice the two chocolate cakes (two cakes baked in two round pans) into two even layers each using cake leveller or long serrated/palette knife. Slice off the parts that has domed. There will be a total of four layers.

Preparing the layers - Using the removable base of a round tart tin or a round cake board, slide the tart tin base or cake board under a chocolate cake layer and carefully transport one cake layer onto a 9 inch round cake board placed on a cake turntable (optional). This method of transferring is to prevent the sponge layer from breaking.

Place 4 to five strips of 2 inch wide baking paper underneath the first cake layer and surrounding the cake (see first picture). This is to prevent the frosting from making a mess on the cake board.

Dab 1/5 of the cream cheese frosting and spread it evenly onto the first cake layer using a palette knife or spatula. Place a second cake layer (using the tart tin base or cake board to transport) carefully over the first cake layer and align it properly with the first layer. Dab 1/5 of the cream cheese frosting and spread it evenly onto the second cake layer using a palette knife or spatula.

Add the 3rd cake layer (using the tart tin base or cake board to transport) and align it well with the first two layers. Dab 1/5 of the cream cheese frosting and spread it evenly onto the second cake layer using a palette knife or spatula.

Lastly, add the 4th and final cake layer (using the tart tin base or cake board to transport) and align it well with the first three layers. Apply a thin layer of cream cheese frosting on the surface and the sides (perimeter) of the cake to seal the crumbs first (crumb coating). Once the crumb coat is done, apply all the remaining cream cheese frosting to the surface and sides of the cake and smooth the frosting using a palette knife. Remove the strips of baking paper carefully.

Notes: 
  1. Cream cheese frosting holds its shape well unrefrigerated.
  2. Flavour for cream cheese frosting can be varied using lemon, calamansi, grapefruti or yuzu zests instead of orange.
  3. Grate the zest over the frosting to allow the orange oil to seep into the frosting. 
  4. Do not omit the zests as it is imparts a great deal of citrus flavour.  
  5. Let the frosted chocolate cake sit at room temperature for 1 to 2 hours if you have the time before serving, the cake will become really moist as it absorbs moisture from the frosting.
  6. Do 1.5 x recipe portion of the chocolate cake in one batch and 4/5 recipe portion of the cream cheese frosting to get a 3 layer cake instead.
  7. One recipe portion will yield a rather short cake which is only enough for a two cake layers.
  8. Add more icing sugar to firm up the consistency of the frosting

Notice:

If you wish to post the recipe and instructions online, please give due credit and do re-phrase the instructions. I have taken quite a bit of effort to construct, edit and type them out. Thank you =]

Monday, March 28, 2011

It's Time for Blackforest!


When I was young, I always wondered what a Black Forest Cake is. My impression back then was that Black Forest cakes are a staple in confectionaries and they always seemed to taste good. Now that I am a home baker, I learnt that a Black Forest Cake is basically a cream cake consisting of cherries and chocolate sponge. I have been wanting to make a Black Forest Cake ever since I started making layer cakes. Somehow, it never materialized. With a pack of opened dairy whipping cream lying in my fridge, it was a good excuse to work on this cake.


I don't quite fancy plain whipped cream cakes but this is one that agrees well with my palate, due to the presence of halved dark sweet cherries and thickened cherry syrup stuffed into the whipped cream layers. The cherry syrup, thickened with corn flour, resembles the consistency of canned blueberry pie filling.


I will be submitting this entry for this month's Aspring Bakers #5: Fruity March hosted by Jess of Bakericious.    


Black Forest Cake ( Chocolate Sponge Cake recipe adapted from 超人气香港蛋糕56款, Cream filling adapted from Delicious cakes by Amy Heng)
Serving size: Makes a 9 inch round cake. Serves 10 to 12 slices
Taste and texture: Cake base is soft, moist and fluffy. Whipped cream is cherry-sweet, smooth and creamy.
Equipment and materials:
  • 9 x 3 inch round pan
  • 10 inch round cake board
  • Cake leveller or palette/serrated knife longer than 8 inches
  • Balloon/wire whisk
  • Rubber spatula
  • Handheld beater/Stand beater
  • Baking paper
  • Wire rack
  • Toothpick/wooden skewer
  • Flour sieve
  • Mixing bowls
  • Cake turntable (optional)
  • Star Piping tip (Wilton # 22)
  • Piping bag
  • Coupler for piping

Chocolate Sponge Cake (3 layers):
  • 85g egg yolks, room temperature
  • 65g caster sugar
  • 5 tbs vegetable oil
  • 5 tbs water
  • 110g cake flour
  • 20g cocoa powder
  • 1/2 tsp + 1/8 tsp baking powder
  • 200g egg whites, room temperature
  • 65g caster sugar

Making the Chocolate Sponge Cake:

Prepare Oven - Preheat oven to 160 degrees C.

Prepare flour mixture - Sift flour, cocoa powder and baking powder in a large bowl. Whisk to combine and allow the dry ingredients to be evenly distributed.

Making the egg yolk batter - Place egg yolks, 65g caster sugar in a large mixing bowl. Whisk egg yolks and sugar until sugar is dissolved. Add in oil and water. Mix well with a wire whisk. Add in the flour mixture and mix to obtain a smooth and thick chocolate batter.

Beating egg whites - In a clean metal mixing bowl, beat egg whites on low speed. Increase speed slowly to medium-high and beat untill egg whites are at soft peaks. Add 65g of sugar gradually and beat untill egg whites are almost stiff and still moist. This is when the beaters are lifted, the egg whites will form peaks that are upright and not drooping slightly. Egg whites will resemble whipped cream.The entire bowl of whites will not drop out when the bowl is overturned. Do not beat until the egg whites are dry and clumpy.

Folding in egg whites - Using a balloon whisk, fold one third of beaten egg whites into egg yolk batter gently to lighten and combine. Fold in the rest of the beaten whites to combine. Final batter should be foamy and uniform in colour with no streaks of egg white present. Folding egg whites gently using a balloon whisk will prevent egg whites from deflating too much.

Baking the sponge cake - Pour batter into a greased and lined 9 x 3 inch round pan and bake at 160 degrees C for 30 -35 minutes. Test doneness using a skewer or toothpick. The highest part of the cake should rise up to 4/5 or nearly the full height of the tin. When the cake is done, the inserted skewer will come out clean. Cake will shrink from edges and in height on cooling. Unmould sponge cake and leave to cool upright on a wire rack.

Whipped Cream Filling and Frosting: 
  • 500ml chilled whipping cream (dairy)
  • 2 1/2 tbs icing sugar
  • 1 can (425g/15oz) dark sweet cherries
  • cherry liquid from can
  • 1 tbs cornflour
  • 1 1/2 tbs sugar

Decorations:
  • 12 whole cherries from can, or 12 fresh cherries or 12 maraschinao cherries.
  • 100ml chilled whipping cream for piping rosettes, (whipped to soft peaks)
  • Enough dark chocolate shavings/choc rice

Preparing whipped cream filling and frosting:

Whipping the cream - Place 500 ml chilled whipping cream in a mixing bowl. Beat the cream on high speed until it reaches mousse state. Add 2 1/2 tbs icing sugar and continue beating the cream on low speed, stopping and checking the consistency every 5 seconds. Beat the cream until it reaches soft peak (80% stiff)

Preparing cherries - Drain the cherries and reserve the cherry liquid. Reserve 12 whole cherries and half the rest. Squeeze halved cherries gently to remove some of the juice. Set aside halved cherries and 12 whole cherries.

Preparing cherry syrup - Place reserved cherry syrup, 1 tbs cornflour and 2 tbs sugar in a saucepan and stir until combined.  Heat the mixture on low heat until it thickens slightly. Allow the cherry syrup to cool completely before use. It will thicken further on cooling.

Assembly:

Slicing sponge cake - Slice sponge cake into 3 even layers using cake leveller or long serrated/palette knife. Slice off the part that has domed.

Preparing the layers - Using the removable base of a round tart tin or a round cake board, slide the tart tin base or cake board under a sponge layer and carefully transport one sponge layer onto a 10 inch round cake board placed on a cake turntable (optional). This method of transferring is to prevent the sponge layer from breaking.

Dab 1/4 of the whipped cream and spread it evenly onto the first sponge layer using a palette knife or spatula. Drizzle half of the cherry syrup randomly over the whipped cream. Scatter half of the halved cherries over the whipped cream layer.

Place a second sponge layer (using the tart tin base or cake board to transport) carefully over the first sponge layer and align it properly with the first layer. Dab 1/4 of the whipped cream and spread it evenly onto the second sponge layer using a palette knife or spatula. Drizzle the remaining half of the cherry syrup randomly over the whipped cream and scatter the remaining halved cherries over the whipped cream layer. 
 
Add the 3rd sponge layer (using the tart tin base or cake board to transport) and align it well with the first two layers. Apply a thin layer of whipped cream on the surface and the sides (perimeter) of the cake to seal the crumbs first (crumb coating). Once the crumb coat is done, add whipped cream to the surface and sides of the cake and smooth the whipped cream using a palette knife.

Decorations:

Piping rosettes and placing cherries - Fill a piping bag fitted with a Wilton #22 star tip (or any other tip you desire). Hold the piping at 45 degrees to the cake surface and gently squeeze out the whipping cream, applying constant pressure and moving your hands in a circular motion to pipe a rosette. Release pressure and pull the tip away to complete the rosette. Pipe 12 rosettes and place each whole cherry between two piped rosettes.

Coating cake with chocolate shavings/rice - Place an over-turned round tin over a large sheet of baking paper. Lift the assembled cake (with the cake board) and rest it on the over-turned round tin (9 or 10 inch would be good). Spoon chocolate shavings/rice onto the sides (perimeter) and the surface (middle) of the assembled cake. Resuse the clean chocolate shavings that fall onto the baking paper if needed.  

Notes:
  1. Whipped cream is not stablized and would not hold its shape for too long at warm room temperature
  2. Soak cherries in cherry liquer for a fuller cherry experience. 
  3. Try practice piping rosettes on a strip of baking paper 1st before piping on the cake surface.
  4. Cream whipped to 70-80% stiff is ideal for piping, filling and frosting. If it is too stiffly whipped, the cream will not be smooth when piped or may separate when it is frosted (if cream is too vigourously handled).  
  5. Use about 3/4 tsp cream of tartar to stabilize the beaten egg whites if required. It will make folding of egg whites easier.
Notice:

If you wish to post the recipe and instructions online, please give due credit and do re-phrase the instructions. I have taken quite a bit of effort to construct, edit and type them out. Thank you =].

Saturday, March 26, 2011

Practice with Fondant Icing - Fondant Rose


I am comtemplating on a cake project in which I need to work with fondant icing. Fondant icing is one aspect of cake making which I am totally unfamiliar with. Hence, working on a fondant cake project means there is plenty of reading up and careful planning to be carried out, to minimize the chances of any mishaps that might happen.

For the cake project, one of my idea is to make fondant roses. After watching some videos on youtubes, I was tempted to try making my own fondant icing and start on a fondant modelling practice session.


The fondant recipe that I referred to worked quite well but somehow heat from my hands makes the fondant icing sticky. I had to dust the fondant and my hands with corn flour constantly to prevent the fondant from softening and sticking to my hands. After some three or four tries, I finally completed a fondant rose without the aid of any modelling tools! 

Working with fondant sure brings a lot of fun. Think of it as modelling with play dough. You don't have to be a sculptor nor a baker to mould fondant icing. It might even get addictive. However, I wouldn't recommend any to taste these fondant decorations since its totally sugary-sweet.

Now that I have taken my first step into fondant making, I might want to explore around a little before I finalize on my cake project. In any case, the fondant roses would be great for adorning any birthday cakes that I will be making in future.

The following are youtube videos which I referred to for making of fondant rose. No tools are required. Have fun!


Making a fondant rose - part 1


Making a fondant rose - part 2

Wednesday, March 23, 2011

My First Blog Award and Not-Quite-Mango Mousse Cake


I would like to thank Jean and Esther for passing this award to me. This is the first time I'm receiving an award related to blogging and I find it rather interesting. Usually, awards are given out to recipients to acknowledge their contribution in their respective fields. In this case, I think of this award as an encouragement, friendship and goodwill between two bloggers.  


Now that mangoes are in season, it means time to buy and use them for baking. On my mind, I have been thinking of making either a mango-upside down cake or a mango mousse cake. After reading Allie's post, I decided to use Florence's mango mousse cake recipe for the 2nd time.

In the previous attempt, the mouse turned out horribly bland when I used Malaysian mangoes. This time round, I used Thai honey mangoes (my mangoes were over-riped) and it did turn out better, but still not up to my expectations. The recipe works perfectly well and I am sure the problem (taste-wise) lies with the variety of mangoes that I have used.  


In local supermarts here, the varieties of mangoes available are quite limited. We have:
  • Malaysian mangoes (Chanakran mangoes, if I did not recall wrongly),
  • Thai honey mangoes
  • Thai rainbow mangoes
  • Thai ivory mangoes
  • Pakistan mangoes (pricey)
  • Taiwan mango king (pricey) 

Out of these varieties, I find that malaysian mangoes are both bland in taste and lacking in sweetness while Thai honey mangoes are sweet but lacking in fragrance. I will probably not be using these two varieties of mangoes in any of my bakes again, using them for cake decorations at most. Maybe fellow bakers and readers out there might to want to share your experience with mangoes.

My other regret for this mango mousse cake is the appearance. I had been careful while filling up the perimeter of the cake (in the cake ring) with mango mousse, pushing the mousse down as best as I could but the cake still turns out with big gaps at the sides.


Mango Mousse Cake ( Sponge recipe adapted from 超人气香港蛋糕56款, Mango mousse recipe slightly modified from Do What I Like and Mango gelee layer recipe adapted from All that Matters)
Taste and Texture: Firm mango mousse layers with moist and light sponge, topped with soft mango jelly.
Serving Size: 10 slices
Equipment:
1) 8 inch round pan
2) 8 inch round cake ring
3) 9 inch round cake board
4) Cake leveller or palette/serrated knife longer than 8 inches
5) Balloon whisk
6) Rubber spatula
7) Handheld beater/Stand beater
8) Baking paper
9) Wire rack
10) Toothpick/wooden skewer
11) Flour sieve
12) Mixing bowls

Sponge cake ( Sponge recipe adapted from 超人气香港蛋糕56款)
70g egg yolks, room temperature
40g caster sugar
4tbs vegetable oil
3 tbs water
95g cake flour
1/2 tsp baking powder
140g egg whites, room temperature
40g caster sugar

Making the sponge cake:
Prepare Oven - Preheat oven to 160 degrees C.

Prepare flour mixture - Sift cake flour and baking powder in a large bowl. Whisk to combine and distribute the ingredients evenly.

Making the egg yolk batter - Place egg yolks and 40g caster sugar in a large mixing bowl. Briefly whisk the egg yolk mixture until the sugar is dissolved. Add in oil and water and stir well.

Folding flour into egg yolk batter - Add the flour mixture to the yolks + oil + water mixture and mix well. Use a spatula to scoop sides and bottom of the bowl to ensure flour mixture is evenly incorporated.

Beating egg whites - Next, whisk egg whites on low speed. Increase speed slowly to medium and beat until egg whites are foamy. Gradually increase speed to high and add the remaining 40g of sugar gradually. Beat until egg whites are almost stiff but still moist. This is when the beaters are lifted, the egg whites will form peaks that are upright and not drooping slightly. Egg whites will resemble whipped cream.The entire bowl of whites will not drop out when the bowl is overturned.

Folding in egg whites - Using a balloon whisk, fold one third of beaten egg whites into egg yolk batter gently to lighten and combine. Fold in the rest of the beaten whites to combine. Final batter should be foamy and uniform in colour with no streaks of egg white present. Folding egg whites gently using balloon whisk will prevent egg whites from deflating too much.

Baking the sponge cake - Pour batter into a greased and lined 8 inch round pan and bake at 160 degrees C for 25 -30minutes. Test doneness using a skewer or toothpick. Cake will shrink from edges on cooling. Unmould sponge cake and leave to cool on a wire rack upright.

Mango Mousse layers: (recipe slightly modified from Do What I Like)
350g fresh mango puree, at room temperature
350ml whipping cream,
3 tbs icing sugar (vary to your liking and the sweetness of the mangoes)
17g gelatine powder soaked in 4 tbs water
about 180g mango, cubed (not too big)

Making mango mousse:
Whipping the cream - Whip cream until it is at mousse state (roughly 70% stiff). Add in icing sugar and whip on low speed to dissolve the sugar.

Making gelatine solution - Soak gelatine in water and allow it to bloom for 5 minutes. Heat the gelatine mixture over a double boiler untill gelatine dissolves completely. Leave to cool.

Making mango mousse - Combine gelatine mixture and mango puree. Fold in whipped cream to obtain a smooth pale-orange mango mousse.

Cake Assembly:
Slicing sponge cake - Slice sponge cake into 2 even layers using cake leveller or long serrated/palette knife. Slice off the part that has domed.

Preparing the sponge and mousse layers - Place one sponge layer into a 8 inch cake ring supported by a cake board below. There should some allowance surrounding the sponge layer. Spread 100g of cubed mango over the first sponge layer. Pour half of the mango mousse over the first sponge layer. I measured the mousse by weight and divided it evenly into 2 portions. Level the mousse as evenly as possible.

Place the second sponge layer over the mousse layer. Spread remaining 100g cubed mango over the second sponge layer. Pour the remaining mousse mixture over the second sponge layer and level the top as evenly as possible. Place cake ring in the refrigerator and allow a chilling time of 4 hours or until mousse is firm.

Mango Gelee layer (recipe adapted from All that Matters)
100g mango puree
2 tsp gelatin
3 tbs water
100g mango, cubed

Making mango gelee layer:
Making gelatine solution - Soak 2 tsp gelatine in 3tbs water and allow it to bloom for 5 minutes. Heat the gelatine mixture over a double boiler untill gelatine dissolves completely. Leave to cool.

Making the mango gelee - Combine cooled gelatine solution and mango puree. Pour it over the chilled and assembled mango mousse cake. Scatter 100g cubed mango over the mango gelee layer. Allow cake to chill until mango gelee layer is firm.

Unmoulding finished cake:
To unmould, wrap a warm kitchen towel around the ring or use a hairdryer to briefly heat up the exterior of the cake ring. Take care not to apply too much heat using the hairdryer. Remove cake ring slowly and steadily. Bring cake back to the refrigerator to firm up before decorating and cutting.

Notes:
1) There is a risk of the mousse oxidizing when exposed to air for some time.
2) Use good quality mangoes for this cake.
3) Do not omit diced mangoes for mousse layers.
4) I'll probably cut down a little on the gelatine for the mango mousse.
5) The mango mousse tends to 'stain' the sponge layers.

Instagram link: http://instagram.com/bakertanbakes
Related Posts with Thumbnails